| AVAILABLE WITH: |
| Windows Player: Premium Web Player: Premium LG webOS Signage Player: Premium Samsung SMART Signage Platform (SSSP / Tizen) Player: Premium BrightSign Player: Premium Android Player: Premium Linux Player: Premium macOS Player: Premium |
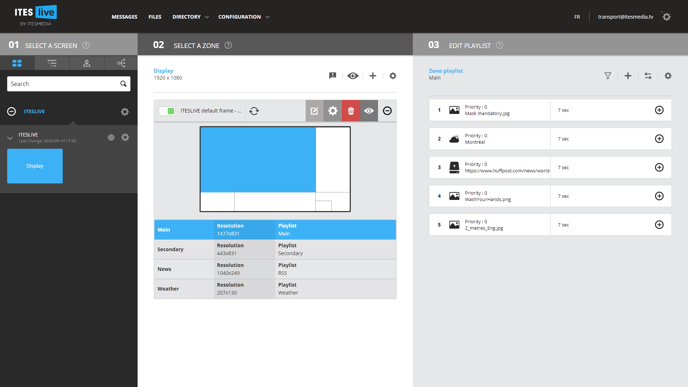
1. Select the zone where you wish to add a transport clip
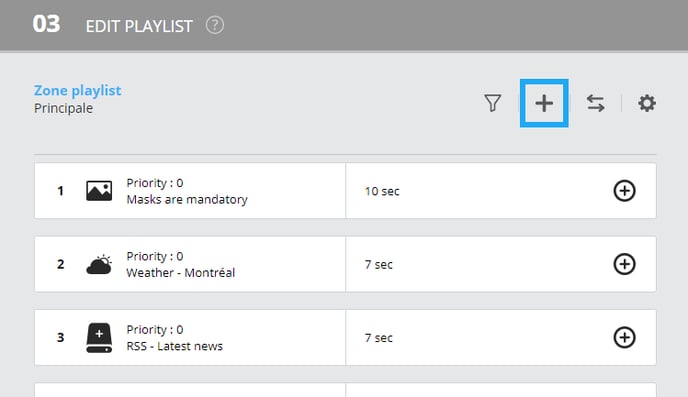
2. Click the " + " icon above the playlist
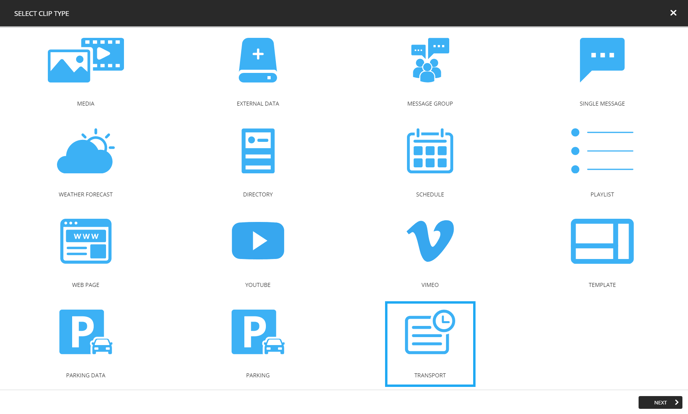
3. Click on " Transport "
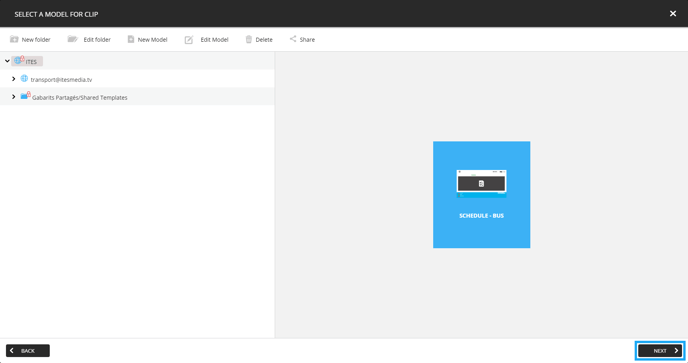
4. Select the template you wish to use and click " Next "
5. Configure transport clip data

Selected stops
The « + » icon to the right of the selected stops list will allow you to access the list of available stops and select which stops are going to be used for this clip's data. Once you have clicked the icon and accessed the « ADD STOP NUMBER » windows, you will be able to navigate the list of available stops and select one to use in the clip. Should you wish to select multiple stops on screen, you can easily do so by holding the « Ctrl » key on your keyboard and clicking the stops you wish to select.
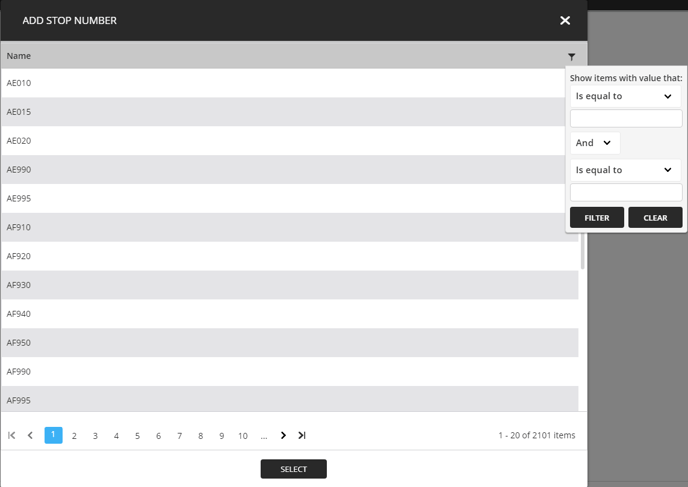
If there are too many stops to navigate manually, you can use the button that represents a funnel in the top right-hand side of the window to filter the stops displayed in the list. You can set up to 2 different filters and indicate whether they are both necessary:
IE: Starts with AE « and » contains 9
Or whether you want to search for different stops simultaneously:
IE: Starts with AE « or » Starts with AF
The drop-down menu for the first and second filters contain the following configurations.
- Is equal to - The result(s) will be identical to the value entered in the text box.
- Is not equal to - The result(s) will not be identical to the value entered in the text box.
- Starts with - The result(s) will begin with the value entered in the text box.
- Contains - The result(s) will contain the value entered in the text box.
- Does not contain - The result(s) will contain the value entered the text box.
- Ends with - The result(s) will end with the value entered in the text box.
Once you have selected the desired stop(s), you may apply your selection by clicking the « SELECT » button at the bottom of the window.
RealtimeConfiguration
This dropdown menu allows display conditions when real-time data is present.
- Prefer real-time - This setting displays real-time data when available. Otherwise, the scheduled time is used.
- Only real-time - This setting displays only real-time data when available.
- Only scheduled time - This setting displays only the scheduled time even if real-time data is available.
Sort by
The sort by drop-down menu allows you to determine how the trips being displayed will be sorted. The available selection here may vary according to the source from which we are receiving your data, that being said, the following are the three possible configurations.
- Arrival time - This configuration will make it so that the trips will be displayed in an ascending order, the trip containing the closest arrival time will be first in the list on screen and the trip containing farthest arrival time will be last.
- Key - This configuration will make it so that the trips will display in an ascending order according to the route numbers associated to the trips. The trip with the lowest route number will be displayed first and the trip with the highest route number will be displayed last.
- Departure time - This configuration will make it so that the trips will be displayed in an ascending order, the trip containing the closest departure time will be first in the list on screen and the trip containing farthest departure time will be last.
Note: If you use either the filter by « Arrival time » or « Departure time » and you do not obtain the expected result in the display. It is probable that the template you are using the opposite value in the display, in this case, testing the opposite configuration can confirm this.
IE: Using the filter by « Arrival time » does not sort the trips correctly.
Change the filter to « Departure time », if the display begins to sort the trips correctly, then the template is using the departure times and not the arrival times.
- Destination - This configuration will make it so that the trips will be displayed in an order determined by their destination.
Trip grouping
- None - This configuration will make it so that trips will not be grouped. Which means that each individual trip, regardless of their associated route, will be displayed on a separate line in the list of data.
- Route - This configuration will make it so that trips will be grouped by route. Which means that trips from the same route will be displayed on the same line in the list of data.
- Destination - This configuration will make it so that trips will be grouped according to their destination. For instance, if routes 10 and 20 both have a trip heading to the same destination, these trips will be broadcast on the same line in the data list despite having a different route.
- All routes for the day - This configuration will make it so that all trips from the same route will be grouped on the same line in the list of data. This type of grouping will display all routes that have trips throughout the day, even if all their trips have already passed.
- All destinations for the day - This configuration will make it so that all trips heading to the same destination will be grouped on the same line in the list of data. This type of grouping will display all destinations that have trips throughout the day, even if all their trips have already passed.
Show cancelled trips
If this checkbox is not active, cancelled trips will simply be removed from the display. If this checkbox is active, cancelled trips will be displayed despite being cancelled, they will be displayed until their scheduled time is passed.
Retrieve stops
This checkbox allows the display of selected stop times. When unchecked, no stop times will be displayed.
Retrieve messages
This checkbox allows the display of GTFS messages. When unchecked, no messages will be displayed.
Refresh rate
The refresh rate is used to determine the delay within which we will attempt to update the data in your transport clip. If we are using a 30 second delay, the display will update its data when it start, the following update will be 30 seconds after that and so on and so forth.
Important: Please note that there can be a slight delay in the update depending on the rate at which your provider produces the information. For instance, if your provider updates every 45 seconds and you set the refresh rate at 30 seconds some of the update checks will not have updated data.
Next trip count
The « Next trip count » determines how many trips per route we take into consideration when the ITESLIVE software updates your transport data.
Important: Please note that the maximum number of trips per route currently used is 3 by our clients. Furthermore, the maximum number of trips per route configured to display in your template will not change due to the configuration inserted here. For instance, if your template contains configurations to display the next 2 trips in the data for each route and you enter 1 in the « Next trip count ». The result in the display will be that only one trip per route will be displayed. Whereas if you enter 3 in the « Next trip count », the result in the display will only display 2 trips per route.
Time before next trip
The « Time before next trip » configuration determines the time frame (in minutes) within which the trips will be taken into consideration when the ITESLIVE software updates your transport. The default configuration makes it so that the software will take into account all trips in the next 240 minutes (4 hours) during each update.
Important: The configuration in your template in regard to the trips being displayed will not change as a result of this configuration. For instance, if your template is configured to display trips within the next 60 minutes the software will synchronize the data for the trips within the next 240 minutes. But they will not be displayed in until they are under the 60 minutes mark.
Once you have applied all of your transport data configurations, you can click on the « Next» button in the bottom right-hand side of the window.
6. Adjust your settings
Click “Next” to adjust your clip settings.