How to broadcast my ITESlive display on Microsoft Teams
Learn how to install the ITESlive app on Microsoft Teams.
| available with: |
| Any device with Microsoft Teams installed |
To broadcast the content of your ITESlive display on Microsoft Teams, you must first login to the ITESlive Studio. Once you are connected, navigate to the player that contains the information that you wish to broadcast.

Once you have selected your player, click the broadcast icon.
Click the URL in the center of the broadcasting window to download the ITESlive application for Microsoft Teams.

Note: In the even that the player type displayed in the broadcasting window in the ITESlive Studio does not represent the type of device you wish to use for your display. It is possible to change this configuration in the ITESlive Studio.
Once the download is completed, open Microsoft Teams and click the « Apps » in the bottom left-hand corner. 
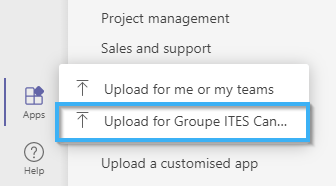
In the bottom right-hand corner of the applications window, click the « Upload a custom app ».
In the list of choices that appears after clicking on the « Upload a custom app » button, select the option that adds the application for your organization rather than a team. 
Note: We recommend that you add the application for your organization because it facilitates the configuration required to make the information available to your entire team. That being said, you can read the following article from the Microsoft documentation for instructions in regard to custom app configuration on Microsoft Teams if you wish to add it to a specific team.
https://docs.microsoft.com/en-us/microsoftteams/platform/concepts/deploy-and-publish/apps-upload#load-your-package-into-teams
When Microsoft Teams opens a file explorer, navigate to the ZIP file that you downloaded earlier. Select it and click on the « Open » button.
When the upload has been completed, you will see an app in Microsoft Teams that represents the ITESlive application.
To add a tab that will broadcast your ITESlive display's content on Microsoft Teams, click the « Teams » button in the list on the left-hand side of the window.
Once on the « Teams » page, click the « + » shaped button.
In the « Add a tab », use the search bar by entering « iteslive » in the text field. Then, click on the application that appears in the search results.
After having clicked the application, a window containing the application's information will open, click the « Add » button.
The last step of the configuration consists of providing the PIN for the display you wish to broadcast. This information is available in the broadcasting window in the ITESlive Studio where you downloading the ZIP file earlier.
Copy and paste the PIN in the PIN field in Microsoft Teams.
Important: Beneath the text field for the display's PIN, there is a check box named « Streaming ». If it is not possible to give the ITESlive application the right to write information on your computer, you must activate this check box. By default, the ITESlive application keeps a local copy of its data on the computer that displays it and activating it will force it to download its data every time the display is used.
Once you have entered your PIN click on the « Save » button.

Once the configuration has been applied, you will see the ITESlive display directly in Microsoft Team.