| available with: |
| Windows Player : Starter, Pro, Premium Web Player : Starter, Pro, Premium LG webOS Signage Player : Starter, Pro, Premium Samsung SMART Signage Platform (SSSP / Tizen) Player : Starter, Pro, Premium Brightsign Player: Starter, Pro, Premium Android Player: Starter, Pro, Premium Linux Player: Starter, Pro, Premium macOS Player: Starter, Pro, Premium |
For several reasons such as moving a display from one location to another or equipment replacements, it is possible that you will need to modify a player's information in the ITESlive Studio. To apply these types of modifications, you must first access the player modification, navigate to the desired player and click the gear to its right and select « Edit ».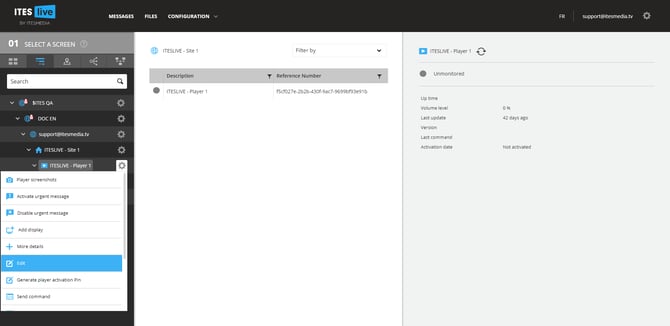
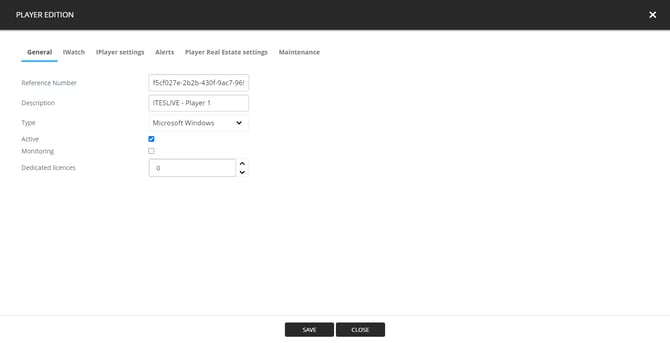
« General » Tab
In the window that opens, there are several tabs within which you can edit the details and configurations for the selected player. By default the general tab is displayed, here you can edit the following information.
- Reference number: The player's reference number is a unique identifier that helps us identify the player.
Important: The reference number is used for the player's authentication with the ITESLIVE servers, thus, if you change it while the display is being broadcast it will stop working.
- Player name: A name that is used to identify the player in most of the ITESlive Studio's interfaces, this field can be edited without having an impact on the display.
- Type: The player type represents the type of device you are using to broadcast your ITESlive display, you may select from the following list of player types.
-
- LG webOS Signage: For broadcasting using an LG webOS Signage monitor
- Linux: For broadcasting using a Linux computer
-
- Microsoft Teams: For broadcasting using Microsoft Teams
- Microsoft Windows: For broadcasting using a Microsoft Windows computer
- Samsung SMART Signage Platform (Tizen): For broadcasting using a Samsung SMART Signage Platform (Tizen) monitor
- Web: For broadcasting using Google Chrome
- Active: This checkbox indicates that the player is active and ready to broadcast.
Important: If you disable this checkbox, your display will stop broadcasting.
- Monitoring: This checkbox allows you to enable or disable the monitoring functions for the selected player, the monitoring refers to the service that sends the player's status to the ITESLIVE Studio and produces the automated alerts when this checkbox is enabled.
- Dedicated licences: This configuration can be used in the event that your display is used in a hybrid work environment, with part of your team working remotely and part of your team working from your offices. For instance, if you have a total of 10 ITESLIVE licenses and that you have 3 physical displays in your offices, you can configure 1 dedicated license for each of those 3 players. This will make it so that your physical displays will not be interrupted should the limit of concurrent licenses (10 in this case) is exceeded, the license of each of your on-site monitors will be reserved and the 11th display that is started remotely will not be displayed.
« IWatch » Tab
The IWatch tab contains the different configurations that determine the delays within which the monitoring service sends its information to the ITESlive software.
Important: Les informations recueillies par le service de surveillance peuvent varier selon les informations disponibles d'une plateforme d'affichage à l'autre.
- Iclient status timer: This configuration indicates the delay within which the ITESlive software confirms that the display is still being broadcast. Should the display have stopped for any reason, at the end of this interval, it will automatically be restarted.
Important: The Iclient status timer is only available with a Microsoft Windows player.
- Command monitoring interval: This configuration indicates the delay within which the ITESLIVE software executes commands sent to it from the ITESLIVE Studio.
Important: Web-based players (such as LG webOS Signage, Android, etc.) the commands are executed upon reception by the device. This configuration applies to Microsoft Windows computers exclusively.
- Hardware monitoring interval (RAM, HD, temp..): Delay within which the player's hardware status information is sent to the ITESLIVE Studio.
- Screenshot monitoring interval: Delay within which the player's screenshots are taken by the ITESlive software.
Important: For players using the Starter license type, the minimum and default value for this field is 1 hour rather than 15 minutes.
- Screenshot monitoring percentage: This configuration determines the size, as a percentage, of the copy of the screenshots that are sent to the ITESlive Studio. For instance, with the default configuration, the size of the screenshot sent to the Studio is 20% of the size of the screenshot taken by the player on-site.

« Alerts » Tab
Note: The alerts are sent by email and you will receive them at the email address that is specified in your preferences.
https://support.itesmedia.tv/en/how-to-configure-your-preferences
The alerts tab contains the configurations that determine when alerts are sent by the ITESlive display.
- Connection
- Send disconnection alerts: Enables the alerts that are sent in the event that the selected player goes offline.
-
- Send first disconnection reminder after: Determines the delay in minutes before the first reminder indicating that the player is offline will be sent. By default, this alert will be sent after 30 minutes.
- Send first disconnection reminder after: Determines the delay in minutes before the first reminder indicating that the player is offline will be sent. By default, this alert will be sent after 30 minutes.
-
- Send second disconnection reminder after: Determines the delay in minutes before the second reminder indicating that the player is offline will be sent. By default, this alert will be sent after 240 minutes.
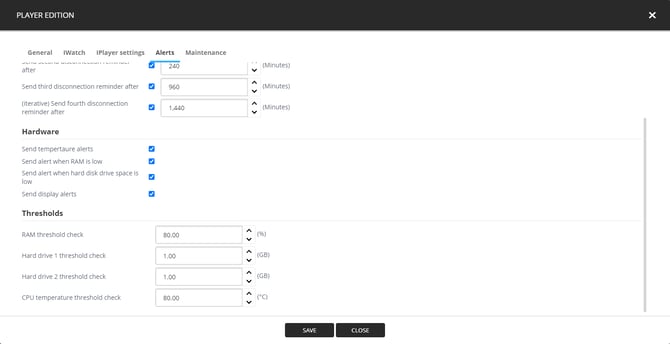
- Send third disconnection reminder after: Determines the delay in minutes before the third reminder indicating that the player is offline will be sent. By default, this alert will be sent after 960 minutes.
- Send fourth disconnection reminder after: Determines the delay in minutes before the fourth reminder indicating that the player is offline will be sent. By default, this alert will be sent after 1440 minutes.
- Hardware
- Send temperature alerts: Enables the alerts that are sent in the event that the device's processor's temperature is above the threshold configured for the selected player.
- Send alert when RAM is low: Enables the alerts that are sent in the event that the usage percentage of the device's RAM is above the threshold configured for the selected player.
- Send temperature alerts: Enables the alerts that are sent in the event that the device's processor's temperature is above the threshold configured for the selected player.
-
- Send alert when hard disk drive space is low: Enables the alerts that are sent in the event that the device's available hard disk space is smaller than the threshold configured for the player.
- Send alert when hard disk drive space is low: Enables the alerts that are sent in the event that the device's available hard disk space is smaller than the threshold configured for the player.
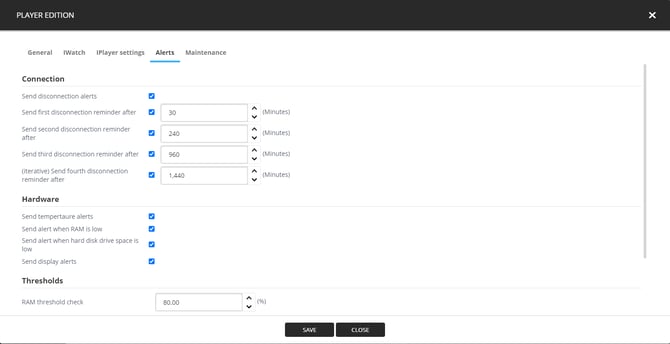
- Thresholds
- RAM threshold check: Determines the threshold that will trigger the alerts indicating the device's RAM usage percentage is too high. By default, an alert will be sent if the RAM usage percentage is above 80%.
- Hard drive 1 threshold check: Determines the threshold that will trigger the alerts indicating that the device's available space for hard drive #1 is too low. By default, an alert will be sent if the remaining space on the first hard disk is below 1 GB.
- Hard drive 2 threshold check: Determines the threshold that will trigger the alerts indicating that the device's available space for hard drive #2 is too low. By default, an alert will be sent if the remaining space on the second hard disk is below 1 GB.
- CPU temperature threshold check: Determines the threshold that will trigger the alerts indicating that the device's processor's temperature is too high. By default, an alert will be sent if the temperature of the device's processor is above 80°C.
- RAM threshold check: Determines the threshold that will trigger the alerts indicating the device's RAM usage percentage is too high. By default, an alert will be sent if the RAM usage percentage is above 80%.
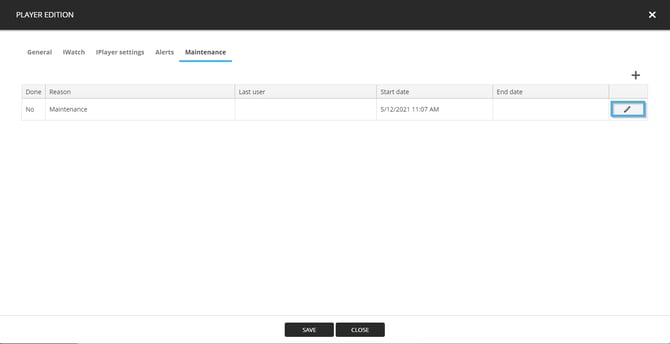
« Maintenance » Tab
In the event that you are aware ahead of time that a player will be offline, whether it is for a known or unknown period of time, it is possible to add a configuration that will indicate that the player is undergoing maintenance. When you select the maintenance tab in the edit player window, there will be a list of maintenances for the selected player. The first time you open this tab, the list will be empty.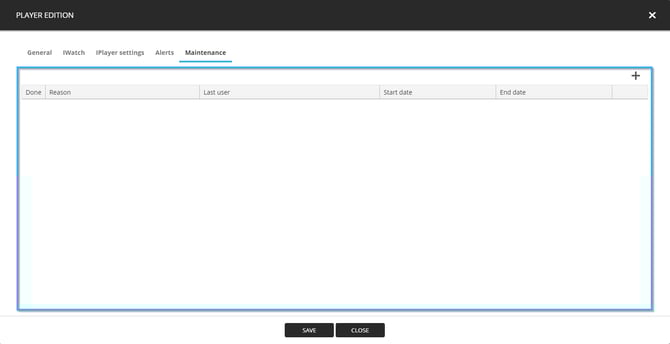
You can add a new maintenance item to the list by clicking the plus icon above the list and entering the following information.
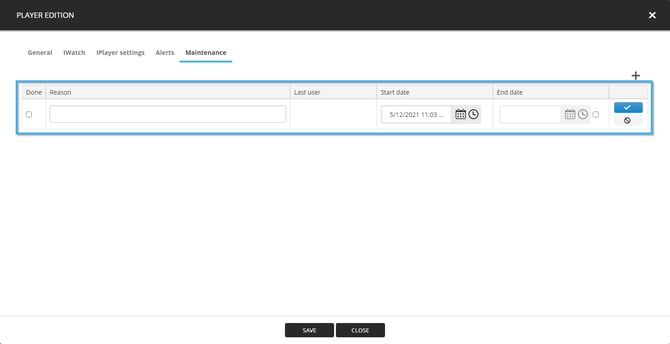
- Done: This checkbox must be activated only when the ongoing maintenance has been completed, it will be activated automatically at the end of a scheduled maintenance period if it has an end date.
- Reason: This text box allows you to write a short text explaining the reason the player will be in maintenance.
- Last user: This field will be filled automatically with the username of the last person who modified the selected maintenance or the username of the person who created it when adding a new maintenance to the list.
- Start date: Start date for the scheduled maintenance period.
- End date: End date for the scheduled maintenance period, this field is activated by using the checkbox to its right. A maintenance period's end date if optional, in the event that you do not know when it will end you may leave this field blank and use the
« done » checkbox to end the maintenance period. If an end date is entered, the maintenance period will end automatically according to this field's configuration.
- Blue checkmark: Click the blue checkmark to save the information entered for the maintenance period.
- Cancel button: Click the icon representing a circle with a bar going through it to cancel any chances applied to the maintenance period.
Once you have saved your maintenance, it will be displayed in the list, you can edit its information by clicking the icon that represents a pencil.