
My screen is black: troubleshooting steps
A black screen can be caused by equipment, player connectivity, licensing, or content settings. Follow the checks that match what you observe. When you identify a cause, follow the linked procedure before continuing.
You need access to the affected player to complete the software checks. If you do not have access, ask your administrator for help. Some checks also require someone in front of the screen.
Before changing anything, identify the symptom:
- Is the entire screen black, or only one zone?
- Is it always black, black only during certain clips, or black only during transitions?
- Is one screen affected, or several?
- When did the issue start, and at what times does it occur?
Ask someone on site to look carefully at the screen’s corners, especially the bottom. A small code may be visible even when the display appears completely black. Write down the exact code or take a photo. Its position may vary with screen orientation.
1. Check for a code on the physical screen
If you see *00
This code means the player cannot validate its license. Possible causes include a prolonged connection loss, expired licenses, insufficient licenses in the account group, or multiple players using the same license or activation PIN.
A player can continue showing its saved content in offline mode during the 30-day tolerance period. After that period without license validation, playback is interrupted and *00 may appear. Being offline for less than 30 days does not, by itself, explain a black screen.
- If the player is offline, check its connection in step 2.
- If licenses have expired or the account group has insufficient licenses, ask your administrator or ITESMEDIA to verify the licensing situation.
- Do not generate a new activation PIN unless a shared-license or activation issue has been identified.
Read: Why is my display dark or dark with a *00 code?.
If you see *01
The *01 code means the maximum permitted playback time for a concurrent license has been reached. Concurrent licenses are used mainly for screensaver installations.
The playback limit is usually four hours, but it can vary depending on the configuration specified in your contract.
If you see *01, contact ITESMEDIA with the player name and the code displayed on screen to confirm the applicable limit and the next action. This code identifies a concurrent-license playback time limit; it should not be interpreted as the *00 license-validation error.
If you do not see a code
Continue with the player’s status and screenshots. Not seeing a code does not, on its own, rule out a licensing issue.
2. Check the player’s status, alerts, and screenshots
- Sign in to the software.
- Under 01 SELECT A SCREEN, switch to Tree View if necessary.
- Select the account group, shown with a globe icon, or the site, shown with a house icon. Its players appear in the center table.
- Click the affected player’s row in that table.
- On the right, review its connection status, alerts, and Screenshots.
- Check how old the screenshots are before comparing them with the reported issue. If the player is connected, use the refresh icon beside its name to request a new screenshot, then verify that a new image has been received.
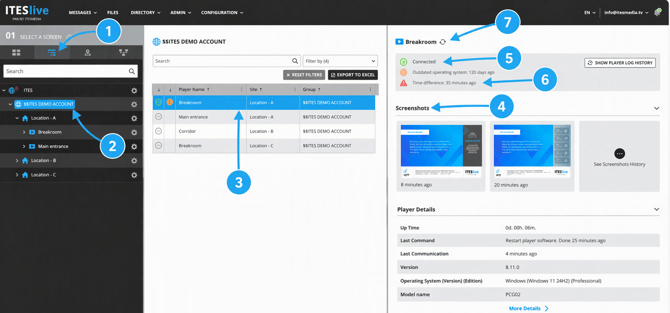
Screenshot guide
- Tree View — Switch to the tree view.
- Account group — Select the group containing the affected player.
- Player selection — Select the affected player in the table.
- Screenshots — Review the latest screenshots and their age.
- Connection status — Check whether the player is connected.
- Alerts — Review any alerts reported for the player.
- Refresh screenshot — Request a new screenshot, then verify that a new image has been received.
Read: Find a player using the search bar and Monitor your displays.
If the player is offline
Follow Screens or players are offline. An offline player may still show saved content, but it does not receive content changes. An old screenshot does not confirm what is currently visible on site.
If the player has been disconnected for more than 30 days, ask someone on site to check for *00. If the disconnection is more recent, continue troubleshooting the black screen while also addressing the connection issue.
If an alert is present
Read its exact name before taking action. An alert does not necessarily identify the cause of the black screen. Pay particular attention to connection, time difference, startup, and external-data alerts.
Read: Find the name of an alert and Alert definitions.
Use the screenshot to choose your next check
- A recent screenshot is black: check the content in step 3.
- Only one zone is black: focus on that zone and its playlist.
- The player is online and a newly requested screenshot shows content, but the physical screen is black: if the screen uses an external player, follow the specific guidance below and go directly to step 6.
- A preview shows content, but you cannot obtain a new screenshot confirming the player’s output: do not treat the preview as proof that the player is working. Continue checking connection status, licenses, content, schedules, and device time as appropriate.
- No recent screenshot is available: use on-site observations and connection status rather than relying on an old image.
The external player is online, a new screenshot shows content, but the screen is black
This combination indicates that the external player is running and generating content. Focus first on the physical screen and the video connection—not the playlist configuration.
Go directly to step 6. Check that the screen is turned on, that the correct input is selected, and that the HDMI cable is securely connected and functioning. If necessary, test with a known-working HDMI cable.
Important: request a new screenshot while someone on site confirms that the affected screen is still black. Confirm that the screenshot belongs to that screen. An old screenshot or a browser preview cannot establish this distinction. This shortcut applies to an external player, not a player built into the screen.
If these equipment checks do not resolve the issue, continue with the screen’s on/off schedule in step 4, or contact support with the results. A generated screenshot does not prove that the physical screen is receiving the video signal.
3. Check display templates and playlist content
A display template defines the screen’s zones and their associated playlists. Click its gear icon to open TEMPLATE DISPLAY SETTINGS, where you can check activation, dates, and recurrence. Some linked articles use the terms “screen layout” or “screen frame” for this same configuration.
Open the screen and preview its content
- Expand the player in the left-hand tree, then select the screen underneath it.
- The center section, 02 SELECT A ZONE, shows display templates and their zones. The right section, 03 EDIT PLAYLIST, shows the playlist associated with the selected zone.
- Click the eye icon on a display template to preview that template. If multiple templates are configured, also use the eye icon at the top of section 02 to preview all templates according to their configuration.
Important: previews are generated locally using your browser’s time. They are not a live view or an exact replica of the player’s output. A working preview does not guarantee that playback is working on the physical screen.
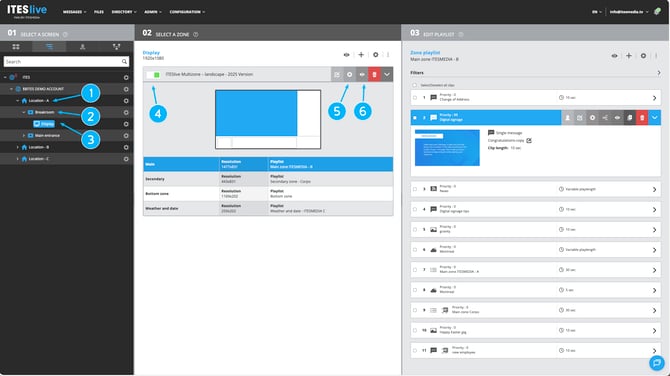
Screenshot guide
- Site selection — Select the site containing the affected player.
- Player selection — Expand the affected player to show its screens.
- Screen selection — Select the affected screen.
- Display template status — Check that the intended display template is active.
- Template display settings — Open the settings to check the template’s activation, calendar, and recurrence.
- Display template preview — Preview the selected template and its zones.
Read: How to use the preview in ITESlive Studio.
If no display template is present
A template must be added and playlists associated with its zones. If you do not know which configuration to restore, ask your administrator or support for help before rebuilding it.
If a template is present but none is eligible to play at the affected time
- Check that at least one intended template is active. Its activation toggle is green.
- Click the gear icon on that display template to open TEMPLATE DISPLAY SETTINGS.
- Under Calendar, check the start and end dates and times.
- Under Recurrence, check the configured recurring periods.
- Correct only unintended restrictions, then click Save. Do not remove an intentional schedule simply to make a template eligible.
Expected result: at least one intended template is active and eligible to play at the required time.
Read: Reactivate a disabled or expired screen layout and Screen frame settings.
Check the playlist for each black zone
- Select the zone and check its associated playlist.
- Confirm that the playlist contains content.
- For clips that should play, open the gear icon and check Active, Calendar, and Recurrence.
- Correct unintended restrictions, then click Save.
- Preview the template again.
An active clip may still be ineligible to play because of its calendar or recurrence. Check both activation and eligibility at the affected time.
Expected result: the zone has content eligible to play at the required time.
Read: Clip settings.
If all eligible clips depend on external data
Ask the person responsible for the integration to verify that data is currently being supplied. A playlist can contain active clips but have nothing to show if those clips all depend on missing external data. Record the integration name and any alerts. An active clip does not confirm that its source data is available.
For information about fallback content when other clips are not eligible, see Default Clip in Clip settings.
If black appears only during certain clips or transitions
Preview the affected clips individually, then preview the full playlist. Note whether the issue occurs in the preview or only on site. Record the clips immediately before and after the black interval, its duration, and the Transition type and Transition length settings. Keep the current settings unchanged until you have identified which adjustment is needed.
Reaching the last clip does not normally end playlist playback: the playlist returns to its beginning. Read: What happens when my playlist reaches its end?.
If you cannot identify the cause, send these observations to support.
4. Check the screen’s on/off schedule
- In Tree View, click the gear beside the affected player.
- Select Screens on/off and software update scheduler.
- Review the day and time when the issue occurs.
- Check the blue Display schedule periods. Do not confuse them with green Version upgrade periods, which are for software updates.
If the schedule does not match the intended playback hours, have the relevant period corrected. Before saving a recurring change, check whether it should affect only the current occurrence or the entire series.
Expected result: the display schedule covers the hours when content should be visible.
Read: How to turn screens on and off.
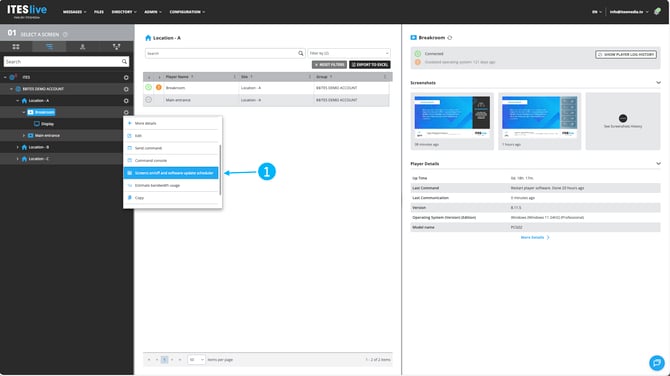
Screenshot guide
- 1. Screens on/off and software update scheduler — Select this option to open the screen’s display and software update schedules.
5. Check the device’s time
If schedules appear correct but playback does not match the intended hours, review the player’s alerts, especially Time difference. The device’s time is separate from the browser time used for previews.
Ask the person responsible for the device to check its time and time zone. Windows, LG webOS, and Samsung Tizen procedures are linked under Time difference in Alert definitions.
An unexpected screenshot age can be a reason to investigate the device’s clock, but it is not proof of a time difference by itself.
ITESMEDIA does not manage your devices and does not have the access or permissions needed to change their date, time, or time zone. Ask your IT team or the person responsible for the device to verify and correct these settings. ITESMEDIA can provide guidance if needed.
6. Check the equipment on site
If you cannot access the software, you can perform these physical checks first and send the results to your administrator.
For a screen with an external player
- Check separately that the screen and player are connected to power and turned on.
- Check that the screen is set to the input connected to the player, such as the appropriate HDMI input.
- Check accessible video-cable connections where safe to do so.
- Try opening the screen’s own menu using its buttons or remote control.
If the screen’s menu appears, the screen can display an image. Continue checking the selected input and the video connection between the screen and the player.
If no menu or other image appears, this may indicate a hardware issue, but it does not confirm that the screen is defective. Ask your IT team or the person responsible for the equipment to check the screen’s power supply and operation.
For a player built into the screen
Check the screen’s power and the player’s status in the software. When the screen is powered off, its built-in player cannot stay connected. However, an offline status can also have other causes, including network issues.
Do not perform a factory reset or undocumented network changes to troubleshoot the black screen.
If the issue continues
Provide ITESMEDIA support with:
- the player name, site, and affected screens;
- when the issue started and when it occurs;
- an on-site photo and the exact code, if present;
- player connection status and exact alert names;
- the latest screenshot and its age;
- preview results;
- affected zones or clips, if relevant;
- checks already completed and recent changes.
Do not include passwords, activation PINs, or other confidential information in screenshots.