| available with: |
| Windows Player : Premium Web Player : Premium LG webOS Signage Player : Premium Samsung SMART Signage Platform (SSSP / Tizen) Player : Premium Brightsign Player: Premium Android Player: Premium Linux Player: Premium macOS Player: Premium |
1. Interface overview
1.1 Infrastructure and network surveillance
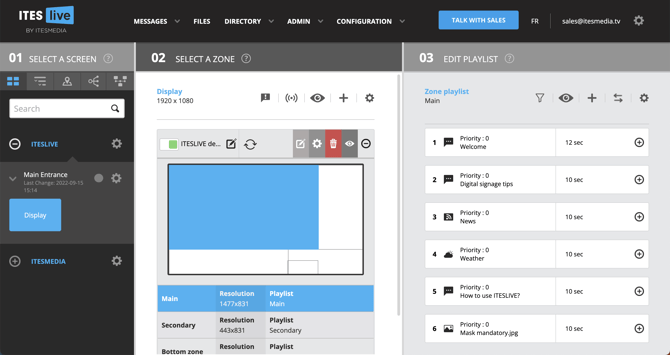
The first part of the training session explains the different sections of the interface to ensure users can properly navigate in the environment. Because this training is intended for display network administrators, emphasis is put on the first section, 01 Select a screen, to properly explain how the display network is structured.
- Different ways to review the display network and the display statuses.
- The account group -» Site -» Player
- Difference between a user’s permissions and the displays they can access based on the account(s) group they are linked to.
Here are links to our online knowledge base related to this subject:
- Infrastructure of a digital signage network on the ITESLIVE Studio
- How to view my players’ status on the ITESLIVE Studio
1.2 Explication des différents types de clips
The second part of the training explains different clip types that can be added. It focuses on the content types that clients actually use.
- Transport (public transit) : Use a template created in the ITESlive editor to make a list of trips for buses or trains.
- Media: Images and videos imported in the platform.
- RSS: Display information from a selected RSS feed.
- Weather: Display current weather, weather forecasts, minimum and maximum temperatures, etc.
- Webpage: Display a webpage.
- YouTube: Show a YouTube video.
- Vimeo: Show a Vimeo video.
- Office 365: Display Word, Excel and PowerPoint files.
- Google: Display Docs, Sheets and Slides files.
- Facebook: Broadcast your post from your professional Facebook page
- Twitter: Broadcast your tweet from your professional Twitter account
- Input source: Display information from the display’s input source (i.e., a television screen using a terminal).
- Playlist: Add a playlist in the list that was already attached to the zone.
- Message: Use a template created in the ITESlive editor with editable fields to quickly share a message using an existing visual for which you simply need to add your copy.
- Template: Use a visual created in the ITESlive editor.
- Message group: Use a template created in the ITESlive editor to make a list of items with the same structure.

2. Adding content
The third part of the training describes adding clips to message lists, with a focus on the content types clients actually use.
Links to detailed information about adding a clip to a message list:
-
- Media: https://support.itesmedia.tv/en/how-to-add-an-image-to-a-playlist
- RSS: https://support.itesmedia.tv/en/how-to-add-an-rss-feed-to-a-playlist
- Weather: https://support.itesmedia.tv/en/how-to-add-a-weather-information-clip-to-your-playlist
- Webpage: https://support.itesmedia.tv/en/how-to-display-a-website-in-a-playlist
- YouTube: https://support.itesmedia.tv/en/how-to-add-a-youtube-video-to-a-playlist
- Vimeo: https://support.itesmedia.tv/en/how-to-add-a-vimeo-video-to-a-playlist
- Office 365: https://support.itesmedia.tv/en/how-to-add-a-microsoft-excel-document-in-a-playlist
- Google: https://support.itesmedia.tv/en/how-to-display-a-google-slide-presentation-in-my-iteslive-display
- Input source: https://support.itesmedia.tv/en/how-to-add-an-input-source-clip
- Facebook: https://support.itesmedia.tv/en/how-to-use-a-facebook-clip
- Playlist: https://support.itesmedia.tv/en/how-to-add-a-playlist-to-another-playlist
- Message: https://support.itesmedia.tv/en/how-to-create-a-message-clip
- Transport: https://support.itesmedia.tv/en/how-to-add-a-transport-clip
3. Clip settings
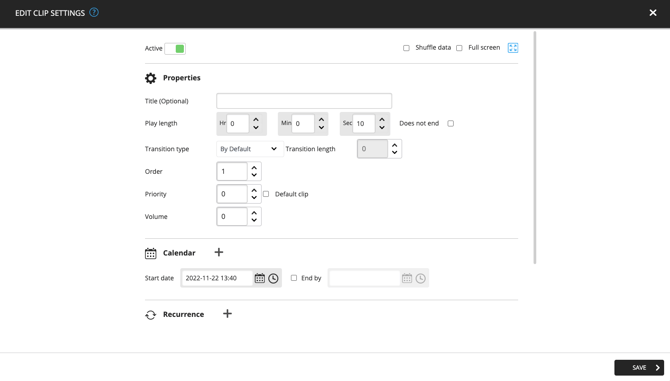
The fourth part of the training explains the last step to follow when adding a clip in a message list, i.e., the “Clip settings”. These settings let users set the clip duration, start and end dates, repetitions and transitions, among others.
To learn all about clip settings: https://support.itesmedia.tv/en/clip-settings.
4. Managing playlist
The fifth part of the training covers the management of playlists. What is displayed on your screens is determined by the content of your playlist. Different types of content can be added in these lists, such as image clips, message clips, RSS clips, weather clips, and many others. All content types you add in a playlist are considered clips, and each zone of your screen includes a playlist.
To learn more about managing playlist: https://support.itesmedia.tv/en/managing-your-playlists.

5. Editing a number of displays simultaneously
The sixth part of the training session explains managing content shared on many different displays. By leveraging playlists, users can manage the content of either a group of displays or their entire display network without having to edit each screen one by one. There are two ways of using playlists to manage the content of many different displays simultaneously:
- Share exactly the same content on all your displays or a group of displays. For more information: https://support.itesmedia.tv/en/how-to-batch-edit-the-content-of-multiple-screens-using-playlists#samecontentforall
- Share both unique content on individual displays and content displayed on various displays. For more information: https://support.itesmedia.tv/en/how-to-batch-edit-the-content-of-multiple-screens-using-playlists#samecontentwithuniquecontent
Playlists enable users to manage many different displays. Furthermore, users can leverage the advanced distribution module to edit content on a number of displays. This highly flexible module greatly streamlines the distribution of content on different displays. For example, users can easily share content on any display, regardless of the structure that was defined at the beginning of the project. To learn more about the advanced distribution module: https://support.itesmedia.tv/en/how-to-use-the-advanced-distribution-module.
6. User management
The second part of the training explains user management processes.
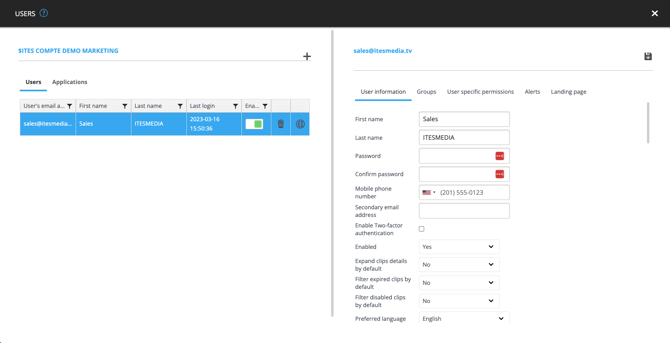
6.1 Users
- Adding a user
- Removing a user
- Deactivating the access of a user
- Defining an end date for a user’s access
- Modifying a user’s group account
- Linking other group accounts to a user
- Setting up a user’s permissions
- Assigning a role to a user
- Setting up notifications received from a user
- Activating a user’s two-factor authentication (can also be activated globally for an entire group account)
Here are links to our knowledge base related to this subject:
- How to add a user
- Managing user permissions
- How to add two-factor authentication details for an existing user
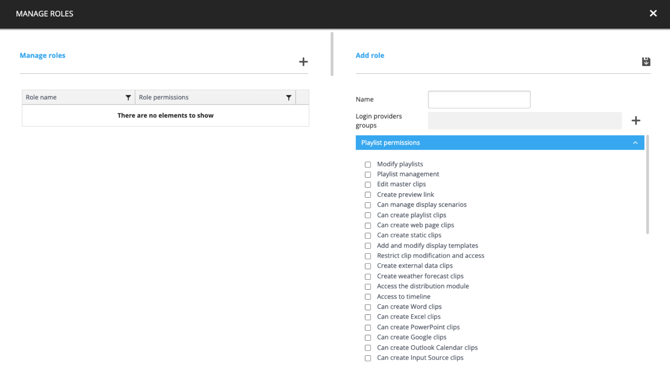
6.2 Roles (Pro and Premium versions)
How to create a role that can then be assigned to current or new users.
Here are links to our knowledge base related to this subject:
6.3 Shared files
How to share file folders, templates and playlists with users and/or accounts group.
6.4 Permissions by content
How to grant access to specific content such as templates and playlists.
For example, if a central playlist managed by the head office is shared on the entire network, it is possible to restrict editing rights to a group of users. As such, the user of a site in particular could continue managing the content of the displays to which they have access without being able to edit (or delete) content that is managed centrally by the head office.
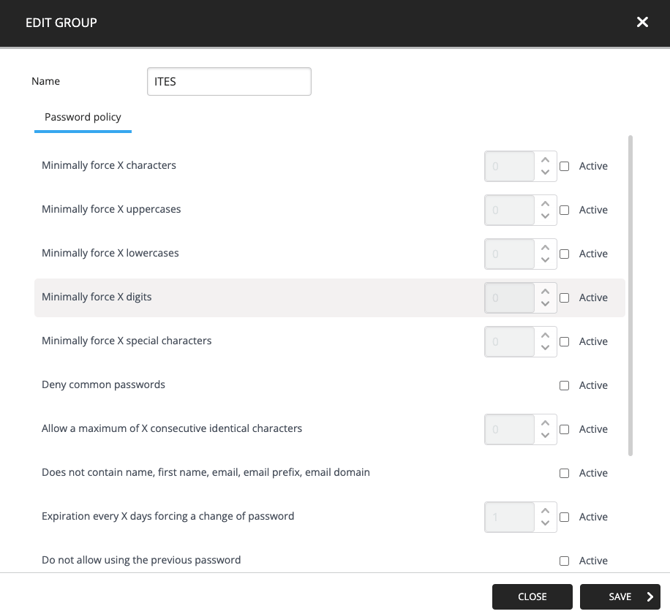
6.5 Password policy
How to set up a password policy and what are the various settings.
Here is a link to our online knowledge base related to this subject:
7. Display player settings
The fifth part of the training presents the various settings and their functionalities that can be leveraged at the player level.
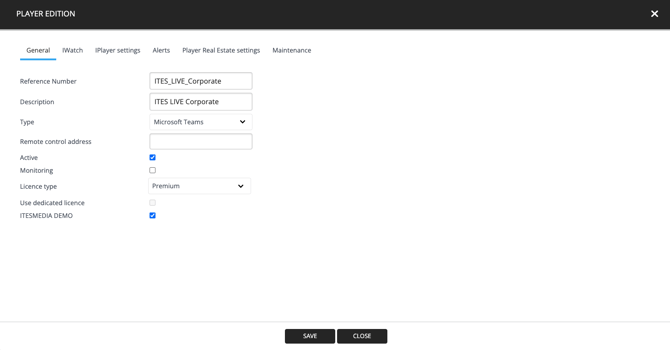
7.1 Editing a player's information
This section enables users to, among others:
- Change the name of a player (if you change the location of the player)
- Activate or deactivate the player
- Assign a display licence to a player
- Change the settings of the IWatch monitoring system
- Set up alert parameters sent by the player
Here are links to our online knowledge base related to this subject:
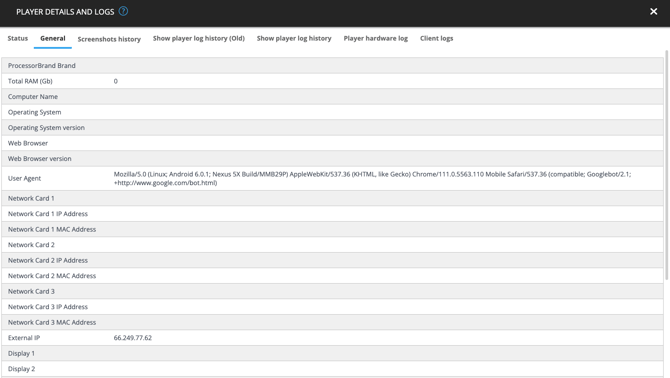
7.2 Accessing a player’s information
The “More details” window shows many types of information on the status of the player, the hardware history (for devices that can provide us this data), the history of screenshots and of player events, as well as some IT-related information (IP address, for example).
Here is a link to our online knowledge base related to this subject:
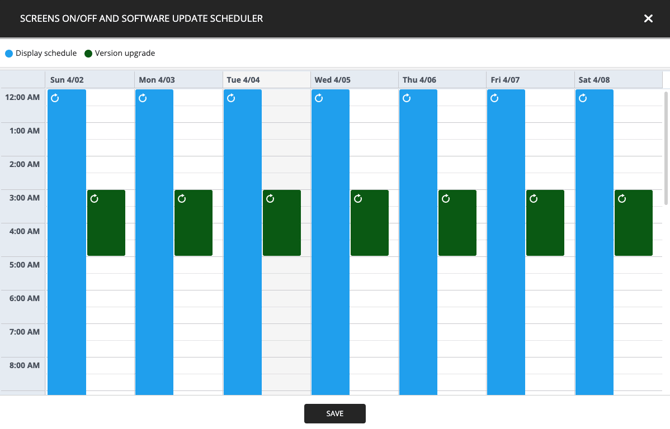
7.3 Status planning and software updates of displays
Used, among others, to set up display start times (turning on) and end times (turning off). These settings can also be managed at the level of a site or an account group to apply the parameters to more than one display at the same time.
Here is a link to our online knowledge base related to this subject:
7.4 Sending commands and viewing the command console
The command console enables users to send commands remotely (from the studio) to the displays. Commands can also be sent to the level of a site or an account group to apply the parameters to more than one display at the same time. Examples of commands:
- Force update
- Turn display on/off
- Computer restart
- Software restart
- Clear database
Here is a link for our online knowledge base related to this subject:

8. Implementation and questions
The last part of the training is a Q&A with users to assess their understanding. The course instructor will ask participants about different steps to follow to ensure notions were properly understood.
After this training session, users can attend additional sessions (depending on the terms of their contract). They can follow personalized sessions, or choose training about the template editor or about managing content.